Quick Guide
Looking for the most detailed and comprehensive IGET Bar Plus instructions? You have come to the right place!
The 30 vaping experts of the IGET team spent 2 months personally using 3 versions of the I GET Bar Plus Vape to present you with the easiest and most detailed IGET Bar Plus Instructions!
This IGET Bar Plus Instructions will cover the following 7 points:
- Vaping method
- Child lock-using method
- Charging method
- Changing pods method
- Storage method
- Cleaning method
- Common malfunctions & solutions
I can’t wait to start explaining how to use the IGET Bar Plus! But before you do, it’s important to make sure you know which version of the IGET Bar Plus you have, as there are differences in how to use the different versions.
Introduction
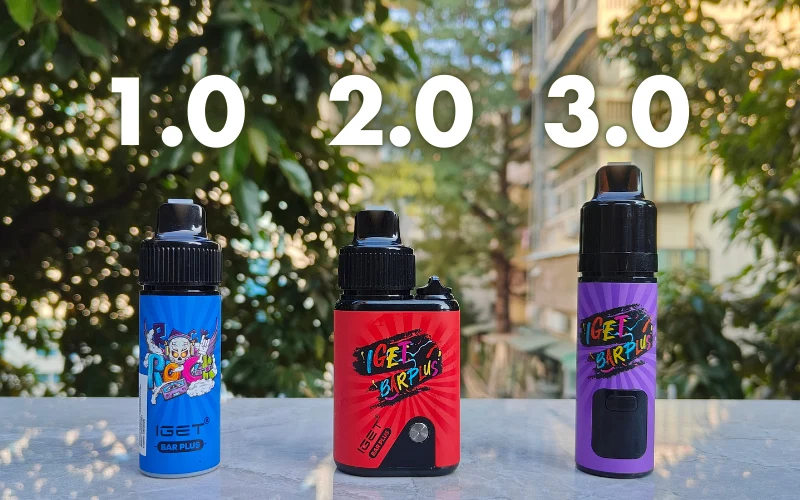
The IGET brand has now released three versions of the IGET Bar Plus, IGET Bar Plus 1.0, IGET Bar Plus 2.0 and IGET Bar Plus 3.0.
Not only do they differ in appearance, but they can also be slightly different in using methods in some aspects.
After identifying the version of your IGET Vape Bar Plus from the image above, we can officially start looking at our IGET Bar Plus Instructions!
IGET Bar Plus Instructions – A Comprehensive Guide
#1 Vaping Method
How to turn on IGET Bar Plus? The vaping method is the same for all three versions of IGET Bar Plus NZ.
Simply place the pod into the device and inhale gently into the mouthpiece to turn on the device and enjoy the delicious vapour.
Some vapers may fail to vape, then you may not be using the IGET Bar Plus child lock correctly.
#2 Child Lock-Using Method
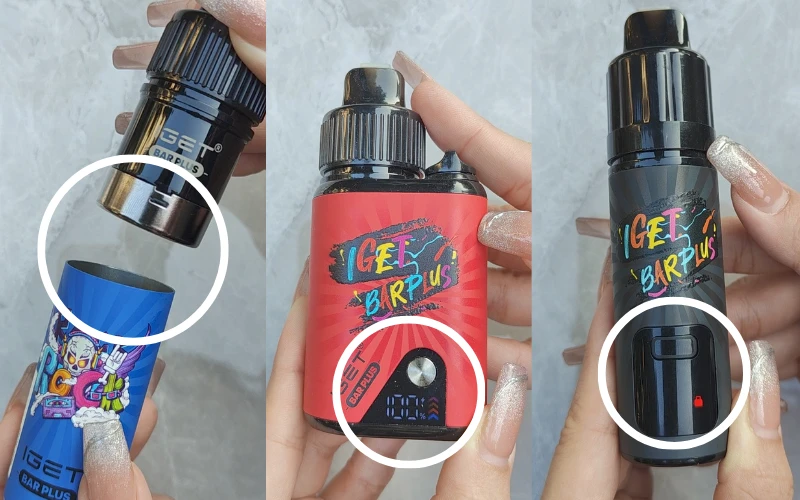
Whilst the IGET Bar Plus vaping method is simple, please ensure that you correctly turn off the child lock and turn on the IGET Bar Plus before use.
Please refer to the IGET Bar Plus child lock instructions below for details.
| IGET Bar Plus Series | Turn on the child lock | Turn off the child lock |
|---|---|---|
| IGET Bar Plus 1.0 | Insert pod into device 3 times within 3 seconds (the white LED blinks 2 times) | Insert pod into device 3 times within 3 seconds (the red LED blinks 2 times) |
| IGET Bar Plus 2.0 | Press the button 5 times quickly within 5 seconds (the arrow on the smart screen flashes up) | Press the button 5 times quickly within 5 seconds (arrow on the smart screen flashes down) |
| IGET Bar Plus 3.0 | Press the button 5 times quickly within 5 seconds (the smart screen shows a red lock) | Press the button 5 times quickly within 5 seconds (the red lock disappears from the smart screen) |
- Turn on/off IGET Bar Plus 1.0: Insert the pod into the device 3 times within 3 seconds.
Tips: The white LED blinks 2 times to indicate that the child lock has been successfully activated. The red LED blinks 2 times to indicate that the child lock has been successfully turned off.
You can also refer to the YouTube video to do so: https://www.youtube.com/watch?v=B4nnaZVZv_M
- Turn on/off IGET Bar Plus 2.0: Press the button 5 times on the smart screen quickly within 5 seconds.
Tips: The arrow on the smart screen flashes upwards to indicate that the child lock has been successfully activated. The arrow on the smart screen flashing downwards indicates that the child lock has been successfully deactivated.
- Turn on/off IGET Bar Plus 3.0: Press the button 5 times on the smart screen quickly within 5 seconds.
Tips: The IGET 3.0 smart screen shows a red lock to indicate successful activation of the child lock. When the red lock disappears from the smart screen, the child lock has been successfully deactivated.
#3 Charging Method
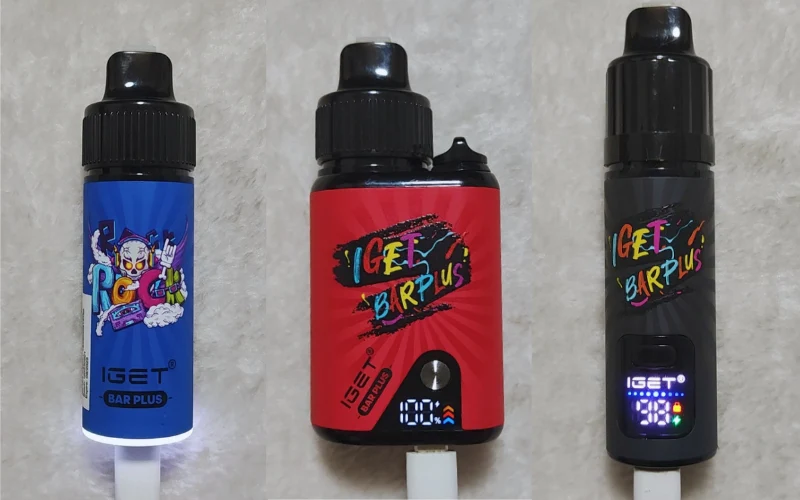
| Collections | Charging Port | Charging Start | Charging Finish | Charging Time | Power Maintenance Time |
|---|---|---|---|---|---|
| IGET Bar Plus 1.0 | Type-C | The bottom ring indicator lights white and stays steady | The ring indicator light goes out | 30-60 mins | 1-2 days |
| IGET Bar Plus 2.0 | Type-C | The white lightning bolt logo on the LED smart screen flashes continuously | The number on the LED smart screen shows 100 | 32-65 mins | 1-3 days |
| IGET Bar Plus 3.0 | Type-C | The green lightning bolt on the LED smart screen flashes continuously | The number on the LED smart screen shows 100 | 30-60 mins | 1-2 days |
Plug the Type-C charger into the charging port on the bottom of the device, and the ring indicator light on the bottom of the device will light up and remain steady to indicate that the device is charging.
After about 30-60 minutes, the ring light turns off, charging is complete.
Plug the Type-C charger into the charging port on the bottom of the device, the white lightning bolt-shaped logo on the LED smart screen keeps flashing while the coloured arrow flashes upwards, which indicates that charging has started.
After about 32-65 minutes, the number on the LED smart screen shows 100, which indicates that charging is complete.
Plug the Type-C charger into the charging port on the bottom of the IGET Bar Plus Kits, and the green lightning-like symbol on the LED smart screen keeps flashing, which indicates that charging has started.
After about 30-60 minutes, the number on the LED smart screen displays 100, indicating that charging is complete.
The battery maintenance time of IGET Bar Plus varies due to different vaping habits such as frequency and duration of vaping.
It is recommended to keep an eye on the power level of the device every day and charge the device in time.
#4 Changing Pods Method
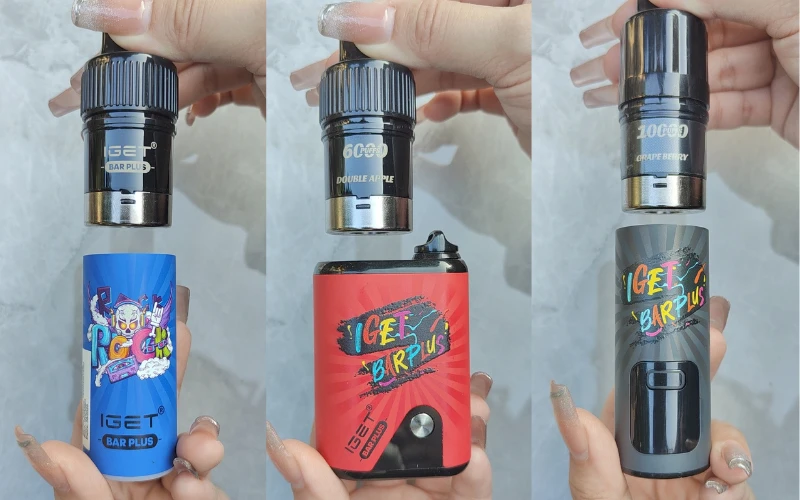
How to take apart IGET Bar Plus and successfully replace it with a new pod to continue the vaping experience? It only takes three steps to fix it.
The method of changing IGET Bar Plus Pods NZ is the same for all versions of the IGET Bar Plus:
- Pull out the old pod from the device upwards.
- Take out the new pod and remove the sticker on the bottom of the pod and the rubber stopper on the top.
- Insert the pod into the device.
When you hear the sound of ‘ta-da’ when the pod and the device are connected magnetically, it indicates that the change of pods is successful.
#5 Storage Method
It is recommended that the IGET Bar Plus be stored in a cool, dry place to avoid expansion of the battery due to high temperatures or evaporation of liquids. The optimum storage temperature is between 10°C and 25°C.
The following are precautions for storing IGET Bar Plus:
Direct sunlight can increase the temperature of the storage environment, accelerating the oxidization of the e-liquid and the depletion of the battery.
Place in a dry place to avoid moisture from entering the electronic components and prevent the device from short-circuiting or malfunctioning.
The nicotine content in the e-liquid is not good for children and pets and should be stored out of their reach.
#6 Cleaning Method
It is recommended to clean your IGET Bar Plus every 1-2 weeks, or weekly if used frequently. Specific cleaning methods are as follows:
Wipe the mouthpiece with a damp paper towel or alcohol pad to remove dirt and bacteria.
Then, wipe the case to prevent liquids or dirt from getting in and damaging the electronics.
Finally, use a dry cotton swab/dry paper towel to clean the connection points between the IGET Plus Pod and the device to maintain good contact.
With proper storage and cleaning, you’ll not only keep your IGET Bar Plus tasting its best, but you’ll also extend its lifespan.
IGET Bar Plus Instructions – Common Malfunctions
Why Is IGET Bar Plus Not Working?
There are 4 common reasons why the IGET Bar Plus does not work.
- Insufficient power
Insufficient power will result in the heating element not having enough power to operate. It is recommended to charge the vape device for 30-60 minutes before attempting to use it.
- E-liquid depletion
It is normal for the IGET Bar Plus not to work due to running out of vape juice. It is recommended to replace the pod with a new one in time to continue the good vaping experience.
- Improper connection
Dust and dirt between the pod and the device may cause improper connection between the two, resulting in the IGET Bar Plus not working properly.
It is recommended to clean the dust and dirt with a dry cotton swab/dry paper towel before attempting to use the device.
- Clogged airflows/mouthpiece
Clogged airflow holes or mouthpieces can prevent the IGET Bar Plus from generating vapour, resulting in the IGET Bar Plus not working.
It is recommended to wipe the mouthpiece and airflow holes with a damp paper towel or alcohol pads before attempting to use the device.
Why Does My IGET Bar Plus Taste Burnt?
The most likely reason for the IGET Bar Plus to have a burnt flavour is that it is running out of vape juice.
Vape juice depletion means that there is not enough vape juice to saturate the coil and wick.
Therefore, when the heating element is activated, it directly heats the dry coil and wick, resulting in a burnt flavour.
It is recommended to replace the pre-filled pod directly with a new one to continue the good vaping experience.
Why Is My IGET Bar Plus Leaking?
- IGET Bar Plus Pod breakage
Excessive squeezing and biting of the mouthpiece can cause the IGET Bar Plus Pod to break, which can lead to the leakage of vape juice inside the Pod.
In this case, it is recommended to simply replace it with a new one for use.
- Insufficient power
Insufficient power can cause the atomizer to fail to properly convert the vape juices into vapours, and the vape juice will be sucked out of the mouthpiece by the vaper in the form of a liquid.
It is recommended to fully charge the device before attempting to use it.
- Vaping speed is too fast
Inhaling too fast may cause the atomizer to be unable to absorb and heat the vape juice in time, and the remaining vape juice will spill out of the mouthpiece or airflow holes.
It is recommended to keep each inhalation within 3-5 seconds. After each inhalation, wait a few seconds for the atomizer core to fully absorb the e-liquids.
Verdict
If you have any questions regarding the use of IGET Bar Plus, please refer to this IGET Bar Plus instructions guide to proceed.
However, if you wish to replace your IGET Bar Plus with a new one or try a popular IGET Bar Plus flavour, IGET Official welcomes you with great prices and attentive service!

